A Tour of My HomeLab: Self-Hosting with Proxmox, K3S, and Zero-Trust Security
There is no cloud, it's just someone else's computer.
In an era where everything seems to live in the cloud, self-hosting your own home lab might seem counterintuitive. Yet, there's something deeply satisfying — and even a bit of nerd joy — in running your own infrastructure. The thrill comes not just from building systems, but from watching them work seamlessly together, learning from failures, and continuously improving your setup. Beyond the technical satisfaction, self-hosting provides complete control over your data, privacy, and system customization. It frees you from vendor lock-in while creating an ideal environment for experimentation and learning.
This blog post takes you through my home lab setup. Beyond the technical specifications, I'll explain how each component aligns with my core design principles, demonstrating how to build a secure, modular, and maintainable infrastructure that grows with your needs.
Design Principles
- Security By Design. Security isn't an afterthought but a foundation, implemented through zero-trust architecture, minimal attack surface, and defense in depth strategies.
- Infrastructure As Code (IAC). Every configuration lives in version control, from Ansible playbooks to Docker compose files and Kubernetes manifests, ensuring reproducibility and documentation.
- Modularity and Loose Coupling. Services are containerized with clear interfaces and boundaries, enabling independent scaling and maintenance without cascading impacts.
- Data Sovereignty. Complete control over data through local-first storage, encrypted backups, and clear data lifecycle policies that put privacy and security first.
- Practical Operations. Focus on maintainable solutions that solve real needs, supported by automated monitoring, updates, and documented recovery procedures.
- Continuous Evolution. Iterative development with a dedicated test environment, clear upgrade paths, and regular evaluation of emerging technologies.
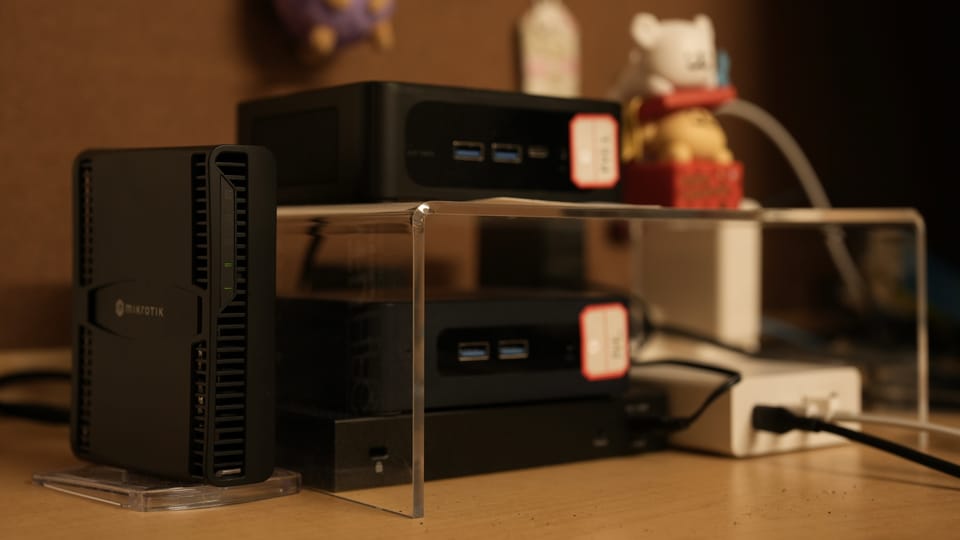
Hardware
At the core of my home lab are two compact, energy-efficient mini PCs. As a student living in university housing, this setup is ideal - the machines are whisper-quiet, take minimal space on my desk, and together consume less than 100W of power:
- BeeLink EQ12: Equipped with an Intel N100 CPU, 16GB RAM, this machine is perfect for lightweight tasks.
- BeeLink SER5: Boasting an AMD 5800H CPU, 64GB RAM, it handles more demanding workloads efficiently.
Both machines run Proxmox Virtual Environment, a robust hypervisor that provides flexible management of virtual machines and containers. This setup strikes an ideal balance between capability and energy efficiency.
Additionally, UptimeKuma is deployed on an external watchdog VPS, providing independent monitoring of my infrastructure. This service is very lightweight and requires minimum resource.
Network
Home Physical Network
- A Mikrotik RouterOS firewall for robust network security and DHCP server
- AdGuard Home DNS for network-wide ad blocking and custom DNS resolution
- A TP-Link managed switch for VLAN capability and traffic management
Overlay Network
To seamlessly connect all services and devices from internal and external of my LAN, I use an overlay network implemented through Tailscale. Think of it as creating a secure, private internet within the internet – allowing devices to communicate directly and securely regardless of their physical location.
In my setup, Tailscale (which is built on WireGuard) creates encrypted point-to-point connections between all services and devices. This means my home servers, VPS, and even my personal devices can communicate as if they were on the same local network, regardless of where they are physically located. This is particularly useful for:
- Securely accessing home services while traveling
- Connecting multiple sites or cloud services into a single network
- Avoiding the complexity of managing VPN servers and port forwarding
A dedicated LXC container serves as a subnet router, creating a bridge between my Tailscale network and home LAN. This configuration enables bidirectional access: devices on my local network can seamlessly reach Tailscale-connected services, while authorized external devices can securely access local resources through the Tailscale overlay.
While I currently rely on Tailscale's managed service for its reliability and ease of use, it's worth noting that Headscale offers a self-hosted alternative for those who prefer complete control over their infrastructure.
Infrastructure as Code
All configurations in my HomeLab are version-controlled and automated. This approach ensures reproducibility, makes changes trackable, and serves as living documentation.
Ansible Automation
Ansible playbooks manage the core infrastructure configuration:
- Base system setup and hardening for all nodes
- Network configuration including hosts files and firewall rules
- Software installation and updates (Docker, monitoring agents)
- Service deployment for non-containerized applications
Docker Compose
While Kubernetes handles most production workloads, Docker Compose serves specific use cases:
- Development environments for testing and experimentation
- Quick deployments for evaluating new applications
- Standalone services that don't require orchestration
Kubernetes Manifests
The K3S cluster configuration follows GitOps principles with:
- Helm charts for complex application deployments
- Custom resource definitions (CRDs) for specialized workloads
- ConfigMaps and Secrets management
- Storage class definitions and persistent volume claims
- Network policies and ingress configurations
Monitoring Stack
Monitoring is centered around Prometheus for metrics collection and Grafana for visualization. The system collects data from various sources:
- Node exporter for system metrics
- Network device exporters for infrastructure insights
- Application-specific metrics from services (e.g. databases, analytics)
In addition, UptimeKuma is deployed on the watchdog VPS offering lightweight monitoring for infrastructure status and notification of any service disruptions.
This external perspective is crucial - if your entire home network goes down due to power outages, ISP issues, or critical system failures, internal monitoring systems would also be offline and unable to alert you. By maintaining a separate watchdog outside your home network, you ensure reliable notifications even during catastrophic failures.
Application Platform
The virtualization layer, built on Proxmox VE, is segmented to balance resource usage and isolation.
LXC containers host lightweight services including AdGuard Home DNS, Cloudflare Tunnel, and the Tailscale network router.
More demanding workloads run in dedicated virtual machines, including the K3S cluster nodes, development environments, and testing playground for new services before deploying into K3S cluster.
Proxmox VE's snapshot and backup capabilities ensure data safety and enable quick recovery when needed.
K3S Cluster
The Kubernetes environment consists of three VMs, each allocated 4 vCPU and 8GB RAM, distributed across both compute nodes. This high-availability setup employs embedded ETCD for cluster state management, providing a robust platform for containerized applications.
Application Access Control
Access to services follows a strict defense-in-depth security model.
- All applications have their own authentications such as username-password
- Most applications are only accessible locally through internal DNS
- External access is secured through Cloudflare Tunnel
- Identity-based access control is handled by Cloudflare Access
- Network segmentation provides additional security layers
Applications
Applications currently running in my HomeLab include:
- HomePage Dashboard: Centralized system monitoring and quick access
- Stirling-PDF: Document management and processing
- Actual Budget: Personal finance tracking
I'm constantly trying and deploying new applications and will keep updating this list.
Looking Forward
The journey of building and maintaining a home lab is never truly complete. Here’s what I have in mind:
- High Availability (HA) Setup. Planning to expand to a three-node Proxmox VE cluster for true high availability. This setup would enable:
- Automatic VM/container failover between nodes
- Distributed quorum for cluster management
- Live migration capabilities for zero-downtime maintenance
- Better VLAN Separation. To better isolate different network segments for better security.
- Local LLM and RAG. Exploring on-premises AI capabilities
Conclusion: The Joy of Self-Hosting
Building a home lab transcends mere server setup; it's about creating a reliable, secure, and scalable environment where you can experiment, learn, and innovate. By following solid design principles, you can build an infrastructure that not only meets your current needs but serves as a foundation for continuous growth.
If you're considering starting your own home lab, don't hesitate. The journey offers invaluable learning experiences and the satisfaction of building something truly your own. Happy building!